
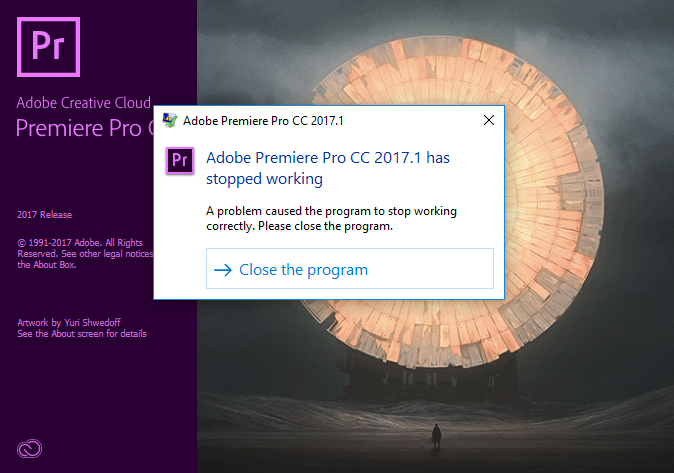
We’ve all been through this. You’re in the zone, and your creativity is flowing like crazy. The cuts are sharp, the color grade is great, and you’re almost ready to record the perfect audio track. Then, out of nowhere, the screen stops working. The dreaded pinwheel shows up. And then… Nothing. A cold, unfeeling error report makes your project disappear. Adobe Premiere Pro has stopped working. Again.
You’re not the only one who has wanted to throw your monitor out the window because Adobe Premiere Pro keeps crashing. From new YouTubers to experienced Hollywood professionals, it’s one of the most common and soul-crushing problems for video editors. The good news is You don’t have to deal with it.
I’ve been an editor for more than ten years. My name is [Your Blog Writer Name]. I’ve seen Premiere Pro crash in every way possible on every kind of project. This isn’t just another list of “try turning it off and on again.” This is a thorough, in-depth guide that will help you figure out the real reason your system is unstable and give you a foolproof plan to fix it. We’ll start with the easy, quick fixes and then move on to the big, long-term changes that will make your editing process go from a game of Russian roulette to a smooth, stable, and creative one.
Let’s get you back to work on your editing.
Understanding the “Why”: What Makes Premiere Pro Crash
We need to know what the problem is before we can fix it. A crash is not usually an act of digital malice. It’s a sign of a bigger problem. Imagine you are a detective at a crime scene. Adobe Premiere Pro is the victim, and we need to look at the evidence to find the person who did it. There are usually four main reasons for the problems.
The Usual Suspects: Software, Drivers, and Cache Conflicts
This is the first place you should always check. Software is complicated and always changing, which makes your machine’s ecosystem very fragile. One weak link can bring down the whole system.
Outdated Software: Are you using the most recent version of Adobe Premiere Pro? How about your operating system? Is it Windows or macOS? Adobe and OS developers are always putting out patches to fix bugs and make things more stable. If you run an older version, it’s like saying no to a free tune-up for your car.
Outdated Graphics Drivers: This is probably the most common reason for crashes that happen when rendering or playing back. Your Graphics Processing Unit (GPU) does the hard work of effects, colors, and exports. The driver is the program that lets Premiere Pro talk to it. A faulty, outdated, or wrong driver (like a “Game Ready” driver instead of a “Studio Driver” for NVIDIA cards) can cause communication problems that make your computer freeze and crash.
Corrupted Media Cache & Preferences: When you import footage into Adobe Premiere Pro, it makes cache files (like .CFA and .PEK files) to help it get to the media faster. This cache can grow huge, get messy, and get corrupted over time. Your preference files, which keep track of your workspace layouts and settings, can also get messed up after a crash, which can lead to a never-ending cycle of crashes.
Plugins that don’t work together: Did you just install that cool new transition pack or color grading plugin from a third party? It could be the cause of your problems. Plugins that are poorly coded or out of date can cause problems and memory leaks that make the whole application unstable.
The Hardware Bottleneck: Is Your Rig Up to the Task?
Adobe Premiere Pro is a resource-hungry monster. Even if your software is the most stable in the world, it will crash if your hardware can’t handle the load you’re putting on it.
Not enough RAM (Random Access Memory): RAM is the short-term memory of your computer. Editing videos, especially 4K videos with a lot of layers and effects, takes up a lot of RAM. Adobe says you need at least 16 GB, but for a smooth 4K workflow, you should start with 32 GB and go up to 64 GB or more for more complicated projects. When your RAM runs out, your computer starts using your slower storage drive as “virtual RAM,” which makes everything slow down and crash.
Overworked CPU (Central Processing Unit): The CPU is the brain of your system. The CPU runs the application’s logic, decodes complicated video codecs (more on that later), and manages the whole system. The GPU takes care of visual effects. A CPU that is too old or too weak will have trouble, which will cause hangs and crashes.
Underpowered or Overheating GPU (Graphics Processing Unit): If your computer crashes while rendering, exporting, or using GPU-accelerated effects like Lumetri Color or Warp Stabilizer, your GPU is probably the problem. It could be that it doesn’t have enough VRAM (video memory) for the resolution and complexity of your timeline, or it could be getting too hot because of bad airflow or dust buildup, which would make it slow down or crash.
Slow Storage Drives: If you edit video directly from a slow external USB 2.0 drive or your main operating system drive (C: drive), you’re asking for trouble. Editing video needs a steady flow of high-speed data. If you use slow drives for your media, project files, or cache, it can cause playback to stutter and the app to stop responding.
The team at Puget Systems has the most complete benchmarks and hardware recommendations for Premiere Pro in the business.
The Media Menace: Not Every Video File Is the Same
This is the secret reason why so many editors get stuck. You might think that “a video is a video,” but how it’s recorded and compressed makes a big difference in how Adobe Premiere Pro works with it.
Variable Frame Rate (VFR) Footage: This is what makes editing unstable. Most professional cameras record in a Constant Frame Rate (CFR), which means that every second has the same number of frames: 24, 30, or 60. But many smartphones, screen recorders (like OBS), and drones record in VFR to save space.
The frame rate changes a little bit from time to time. Premiere Pro and other editing software are made to work with CFR. When it comes across VFR media, it has trouble keeping track of the timing, which causes audio sync drift, choppy playback, and crashes.
Highly Compressed Long-GOP Codecs (H.264/H.265): Most of the time, the files that come straight from your DSLR, mirrorless camera, or phone are H.264 or H.265 (HEVC). These are delivery codecs, not editing codecs. They use a method called “Long-GOP” compression, which means that the software can’t just look at one frame; it has to look at a group of frames that come before and after it to put the image back together.
Your CPU needs a lot of processing power to decode this in real time on a complicated timeline. The “Adobe Premiere Pro keep crashing” problem and slow performance are mostly caused by asking your CPU to decode a lot of these streams at once.
Corrupted Media Files: A single corrupted video file can sometimes be the problem. A problem with the file transfer from your SD card or a bad sector on your hard drive can make a clip unusable. When the playhead in Premiere Pro reaches that exact point on the timeline, it doesn’t know how to handle the bad data and crashes.
The Human Element: Workflow and Project Bloat
Last but not least, we need to think about our own habits. A workflow that isn’t well-organized and doesn’t work well can put extra stress on the software and make it unstable.
Huge Project Files: A single Premiere Pro project file that has hundreds of sequences, thousands of imported clips, and a lot of offline media can get slow and corrupt.
Too Many Layers: Putting too many 4K video layers, multiple instances of processor-intensive effects like Warp Stabilizer or Noise Reduction, and complicated nested sequences on top of each other can make even the most powerful system crash.
Not Keeping Up with Maintenance: Not clearing your cache, not organizing your media, and just putting everything into one big project is like not cleaning your workshop. Eventually, it turns into a place that is dangerous and doesn’t work.
The Fix-It Protocol: A Step-by-Step Guide to Fixing Things
Alright, detective. We have looked around the crime scene and found the main suspects. It’s time to do something now. Follow this order of steps, starting with the easiest and most common fixes and working your way up to the more complicated ones.
Level 1: The Quick Fixes (Try These First!)
Do these simple things before you do anything big. They fix a lot of problems.
The old-fashioned fix is to restart both Premiere Pro and your computer. It clears out temporary memory and can fix small problems that happen only once.
Make Changes to Everything:
Adobe Premiere Pro: Open the Adobe Creative Cloud app and look for updates.
Graphics Drivers: Go straight to the website of the company that made them. Don’t trust Windows Update.
NVIDIA Studio Drivers (For better stability in creative apps, pick the “Studio Driver” instead of the “Game Ready” one).
Operating System: Look for and install any updates that are waiting for Windows or macOS.
Reset Preferences & Clear Media Cache: This is the one thing that fixes a lot of problems. It makes Premiere Pro start over without deleting your project files.
To clear the media cache, go to “Edit > Preferences > Media Cache” on Windows or “Premiere Pro > Settings > Media Cache” on macOS. Click “Delete…” next to Media Cache Files and choose to delete all of the files that are stored in the cache.
Reset Preferences: Close Premiere Pro. Press and hold Alt (Windows) or Option (macOS) while you restart it. You will see a splash screen. Hold down the key until a box pops up asking if you want to change your settings. Click OK. This will reset your custom keyboard shortcuts and workspaces.
Level 2: Making Your Project and Media the Best They Can Be
If the quick fixes didn’t work, the problem is probably with your project or media. This is where we put into practice good work habits.
Make Proxies: This is the best thing you can do to speed up your computer and stop it from crashing, especially with 4K, 6K, or H.265 video. A proxy is a copy of your original media that is low-resolution and easy to edit. You edit with the small, smooth proxy files, and when you export, Premiere Pro links back to the original files with high quality.
How to Do It: Click on your clips in the Media Browser, right-click, and choose “Proxy > Create Proxies.” The “ProRes 422 Low Resolution Proxy” preset in “QuickTime” format is a popular choice. To switch between the original and proxy files, just click the “Toggle Proxies” button (the icon with two screens) under your Program Monitor. You can read our full tutorial on the Premiere Pro Proxy Workflow at Our Deep Dive on the Premiere Pro Proxy Workflow.
Transcode VFR Footage: You must change Variable Frame Rate footage to Constant Frame Rate before you can import it into Premiere.
Use HandBrake: This free tool, HandBrake, is great for this. To start encoding, drag your phone or screen recording footage into the program, click on the “Video” tab, and then click on “Constant Framerate.”
Use Adobe Media Encoder: You can also do this in Media Encoder by making an ingest preset that changes the format of the footage to CFR, like ProRes.
Find Corrupted Media: If you think one clip is bad, try the “divide and conquer” method. Make the top half of your timeline layers invisible. Is it still crashing? If not, the issue is in the top half. Keep narrowing it down until you find the exact clip that makes the program crash when you turn on visibility. Once you find that file, re-transfer or re-transcode it.
Level 3: Getting Deeper into Premiere Pro Settings
Now we’re making changes to the engine itself. These settings can make a big difference in how stable things are.
Change the Video Renderer: Click on “File,” then “Project Settings,” and then “General.” Find the setting that says “Video Rendering and Playback.” If it says “Mercury Playback Engine GPU Acceleration (CUDA/Metal/OpenCL),” try switching it to “Mercury Playback Engine Software Only.” If this stops the crashes, it’s a sure sign that your problem is with your GPU or its drivers. “Software Only” will take a lot longer, but it’s a great way to find out what’s wrong.
Give More RAM: On Windows, go to “Edit > Preferences > Memory,” and on macOS, go to “Premiere Pro > Settings > Memory.” To give Adobe Premiere Pro more memory to work with, lower the “RAM reserved for other applications.” Your OS needs at least a few gigabytes of space.
Manage Plugins: Look for the “Plugin Loading” report in the Media & Cache preferences. Check to see if anything didn’t load. To see if Premiere Pro becomes stable, you can move your third-party plugins out of the Adobe plugins folder for a short time. You can usually find the folder at C:\Program Files\Adobe\Common\Plug-ins\7.0\MediaCore.
Level 4: The Last Resorts
If you’ve done everything above and Adobe Premiere Pro keeps crashing, you need to take more drastic steps.
Clean Reinstall: Don’t just uninstall the program normally. To get rid of all traces of Premiere Pro from your computer, use the Adobe Creative Cloud Cleaner Tool. After that, use the Creative Cloud app to do a new installation.
Get in touch with Adobe Support: You pay for a subscription, which includes support. They can often look at crash logs and find problems that the user can’t see. Be ready to tell them about your project, your system, and what you’ve already tried. To get help, go to the Adobe Support Community.
Proactive Habits: A Guide to Living a Life Without Crashes
It’s great to fix things, but it’s even better to stop them from happening in the first place. If you make these habits a part of your daily editing routine, the chances of future crashes will go down a lot.
Start Projects Off Right: Make a clear folder structure for your project before you import any files. This should include folders for “Project Files,” “Media,” “Audio,” “Graphics,” “Exports,” and “Cache.”
The Golden Workflow: This is the process you must follow for every new project:
Move all of your media from SD cards to a fast SSD (not the drive where your operating system is installed).
Use HandBrake to change any phone or screen recordings to CFR.
Put it into Premiere Pro.
Choose all of the 4K/UHD or H.264/H.265 media and make ProRes proxies.
Turn on proxies before you edit.
Save Often: Ctrl+S (Windows) or Cmd+S (macOS) should be a nervous habit. You should also go to “Preferences > Auto Save” and set it to save every 5 to 10 minutes.
Render and Replace: If you have a clip with a lot of heavy effects (like Warp Stabilizer + Lumetri Color + Noise Reduction), right-click on it and choose “Render and Replace.” This puts the effects into a new, clean video file, which makes the processing load less in real time.
Keep Your System Clean: To keep your computer from getting too hot, clean the dust out of the fans and heatsinks every few months.
Questions and Answers (FAQ)
Q1: Will adding more RAM stop Adobe Premiere Pro from crashing?
A: Yes, but only if the problem is not enough RAM. If you only have 16 GB of RAM and are editing 4K video, upgrading to 32 GB or 64 GB will make a big difference in how stable it is. If your crashes are caused by a bad driver or VFR footage, though, adding more RAM won’t fix the main issue.
Q2: Can a certain effect make Adobe Premiere Pro crash?
Yes, for sure. Warp Stabilizer, Neat Video (a third-party denoiser), and complicated Lumetri Color stacks are some of the most common causes, especially on systems that aren’t very powerful. Using them can use up all of your CPU or GPU VRAM, which can cause a crash.
Q3: Why does Adobe Premiere Pro keep crashing when I try to export?
- A: This is almost always a problem with the hardware or the media. The export process is the hardest thing you can ask your computer to do. A crash here usually means that the CPU or GPU is too hot. 2) A single corrupted media file or effect on the timeline that it can’t handle. 3) When the render runs out of RAM or VRAM.
Conclusion: Your Way to a Stable Editing Experience
It’s really annoying when Adobe Premiere Pro keeps crashing, but it’s not impossible to fix. It’s not usually as simple as pushing a button; you need to take a more holistic approach to your work. It’s important to know how your software, hardware, media, and workflow all work together.
You can go from being a victim of your software to its master by treating your editing system like a professional workshop. This means keeping your tools sharp (updates), your materials organized (media management), your workbench clean (cache), and using the right tools for the job (proxies).
This guide is like a set of tools for you. Start with the easy fixes, then move on to the diagnostics. Most importantly, start doing the things that will save you a lot of time and frustration. Now, go make something great that will last.
*Please share your own “Premiere Pro keeps crashing” stories and fixes in the comments below! Your experience might be what another editor needs to get better.
The Ultimate Guide: Why Does Adobe Premiere Pro Keep Crashing? (And How to Fix It for Good)
We’ve all been through this. You’re in the zone, and your creativity is flowing like crazy. The cuts are sharp, the color grade is great, and you’re almost ready to record the perfect audio track. Then, out of nowhere, the screen stops working. The dreaded pinwheel shows up. And then… Nothing. A cold, unfeeling error report makes your project disappear. Adobe Premiere Pro has stopped working. Again.
You’re not the only one who has wanted to throw your monitor out the window because Adobe Premiere Pro keeps crashing. From new YouTubers to experienced Hollywood professionals, it’s one of the most common and soul-crushing problems for video editors. The good news is You don’t have to deal with it.
I’ve been an editor for more than ten years. My name is [Your Blog Writer Name]. I’ve seen Premiere Pro crash in every way possible on every kind of project. This isn’t just another list of “try turning it off and on again.” This is a thorough, in-depth guide that will help you figure out the real reason your system is unstable and give you a foolproof plan to fix it. We’ll start with the easy, quick fixes and then move on to the big, long-term changes that will make your editing process go from a game of Russian roulette to a smooth, stable, and creative one.
Let’s get you back to work on your editing.
Understanding the “Why”: What Makes Premiere Pro Crash
We need to know what the problem is before we can fix it. A crash is not usually an act of digital malice. It’s a sign of a bigger problem. Imagine you are a detective at a crime scene. Adobe Premiere Pro is the victim, and we need to look at the evidence to find the person who did it. There are usually four main reasons for the problems.
The Usual Suspects: Software, Drivers, and Cache Conflicts
This is the first place you should always check. Software is complicated and always changing, which makes your machine’s ecosystem very fragile. One weak link can bring down the whole system.
Outdated Software: Are you using the most recent version of Adobe Premiere Pro? How about your operating system? Is it Windows or macOS? Adobe and OS developers are always putting out patches to fix bugs and make things more stable. If you run an older version, it’s like saying no to a free tune-up for your car.
Outdated Graphics Drivers: This is probably the most common reason for crashes that happen when rendering or playing back. Your Graphics Processing Unit (GPU) does the hard work of effects, colors, and exports. The driver is the program that lets Premiere Pro talk to it. A faulty, outdated, or wrong driver (like a “Game Ready” driver instead of a “Studio Driver” for NVIDIA cards) can cause communication problems that make your computer freeze and crash.
Corrupted Media Cache & Preferences: When you import footage into Adobe Premiere Pro, it makes cache files (like .CFA and .PEK files) to help it get to the media faster. This cache can grow huge, get messy, and get corrupted over time. Your preference files, which keep track of your workspace layouts and settings, can also get messed up after a crash, which can lead to a never-ending cycle of crashes.
Plugins that don’t work together: Did you just install that cool new transition pack or color grading plugin from a third party? It could be the cause of your problems. Plugins that are poorly coded or out of date can cause problems and memory leaks that make the whole application unstable.
The Hardware Bottleneck: Is Your Rig Up to the Task?
Adobe Premiere Pro is a resource-hungry monster. Even if your software is the most stable in the world, it will crash if your hardware can’t handle the load you’re putting on it.
Not enough RAM (Random Access Memory): RAM is the short-term memory of your computer. Editing videos, especially 4K videos with a lot of layers and effects, takes up a lot of RAM. Adobe says you need at least 16 GB, but for a smooth 4K workflow, you should start with 32 GB and go up to 64 GB or more for more complicated projects. When your RAM runs out, your computer starts using your slower storage drive as “virtual RAM,” which makes everything slow down and crash.
Overworked CPU (Central Processing Unit): The CPU is the brain of your system. The CPU runs the application’s logic, decodes complicated video codecs (more on that later), and manages the whole system. The GPU takes care of visual effects. A CPU that is too old or too weak will have trouble, which will cause hangs and crashes.
Underpowered or Overheating GPU (Graphics Processing Unit): If your computer crashes while rendering, exporting, or using GPU-accelerated effects like Lumetri Color or Warp Stabilizer, your GPU is probably the problem. It could be that it doesn’t have enough VRAM (video memory) for the resolution and complexity of your timeline, or it could be getting too hot because of bad airflow or dust buildup, which would make it slow down or crash.
Slow Storage Drives: If you edit video directly from a slow external USB 2.0 drive or your main operating system drive (C: drive), you’re asking for trouble. Editing video needs a steady flow of high-speed data. If you use slow drives for your media, project files, or cache, it can cause playback to stutter and the app to stop responding.
The team at Puget Systems has the most complete benchmarks and hardware recommendations for Premiere Pro in the business.
The Media Menace: Not Every Video File Is the Same
This is the secret reason why so many editors get stuck. You might think that “a video is a video,” but how it’s recorded and compressed makes a big difference in how Adobe Premiere Pro works with it.
Variable Frame Rate (VFR) Footage: This is what makes editing unstable. Most professional cameras record in a Constant Frame Rate (CFR), which means that every second has the same number of frames: 24, 30, or 60. But many smartphones, screen recorders (like OBS), and drones record in VFR to save space.
The frame rate changes a little bit from time to time. Premiere Pro and other editing software are made to work with CFR. When it comes across VFR media, it has trouble keeping track of the timing, which causes audio sync drift, choppy playback, and crashes.
Highly Compressed Long-GOP Codecs (H.264/H.265): Most of the time, the files that come straight from your DSLR, mirrorless camera, or phone are H.264 or H.265 (HEVC). These are delivery codecs, not editing codecs. They use a method called “Long-GOP” compression, which means that the software can’t just look at one frame; it has to look at a group of frames that come before and after it to put the image back together.
Your CPU needs a lot of processing power to decode this in real time on a complicated timeline. The “Adobe Premiere Pro keep crashing” problem and slow performance are mostly caused by asking your CPU to decode a lot of these streams at once.
Corrupted Media Files: A single corrupted video file can sometimes be the problem. A problem with the file transfer from your SD card or a bad sector on your hard drive can make a clip unusable. When the playhead in Premiere Pro reaches that exact point on the timeline, it doesn’t know how to handle the bad data and crashes.
The Human Element: Workflow and Project Bloat
Last but not least, we need to think about our own habits. A workflow that isn’t well-organized and doesn’t work well can put extra stress on the software and make it unstable.
Huge Project Files: A single Premiere Pro project file that has hundreds of sequences, thousands of imported clips, and a lot of offline media can get slow and corrupt.
Too Many Layers: Putting too many 4K video layers, multiple instances of processor-intensive effects like Warp Stabilizer or Noise Reduction, and complicated nested sequences on top of each other can make even the most powerful system crash.
Not Keeping Up with Maintenance: Not clearing your cache, not organizing your media, and just putting everything into one big project is like not cleaning your workshop. Eventually, it turns into a place that is dangerous and doesn’t work.
The Fix-It Protocol: A Step-by-Step Guide to Fixing Things
Alright, detective. We have looked around the crime scene and found the main suspects. It’s time to do something now. Follow this order of steps, starting with the easiest and most common fixes and working your way up to the more complicated ones.
Level 1: The Quick Fixes (Try These First!)
Do these simple things before you do anything big. They fix a lot of problems.
The old-fashioned fix is to restart both Premiere Pro and your computer. It clears out temporary memory and can fix small problems that happen only once.
Make Changes to Everything:
Adobe Premiere Pro: Open the Adobe Creative Cloud app and look for updates.
Graphics Drivers: Go straight to the website of the company that made them. Don’t trust Windows Update.
NVIDIA Studio Drivers (For better stability in creative apps, pick the “Studio Driver” instead of the “Game Ready” one).
Operating System: Look for and install any updates that are waiting for Windows or macOS.
Reset Preferences & Clear Media Cache: This is the one thing that fixes a lot of problems. It makes Premiere Pro start over without deleting your project files.
To clear the media cache, go to “Edit > Preferences > Media Cache” on Windows or “Premiere Pro > Settings > Media Cache” on macOS. Click “Delete…” next to Media Cache Files and choose to delete all of the files that are stored in the cache.
Reset Preferences: Close Premiere Pro. Press and hold Alt (Windows) or Option (macOS) while you restart it. You will see a splash screen. Hold down the key until a box pops up asking if you want to change your settings. Click OK. This will reset your custom keyboard shortcuts and workspaces.
Level 2: Making Your Project and Media the Best They Can Be
If the quick fixes didn’t work, the problem is probably with your project or media. This is where we put into practice good work habits.
Make Proxies: This is the best thing you can do to speed up your computer and stop it from crashing, especially with 4K, 6K, or H.265 video. A proxy is a copy of your original media that is low-resolution and easy to edit. You edit with the small, smooth proxy files, and when you export, Premiere Pro links back to the original files with high quality.
How to Do It: Click on your clips in the Media Browser, right-click, and choose “Proxy > Create Proxies.” The “ProRes 422 Low Resolution Proxy” preset in “QuickTime” format is a popular choice. To switch between the original and proxy files, just click the “Toggle Proxies” button (the icon with two screens) under your Program Monitor. You can read our full tutorial on the Premiere Pro Proxy Workflow at Our Deep Dive on the Premiere Pro Proxy Workflow.
Transcode VFR Footage: You must change Variable Frame Rate footage to Constant Frame Rate before you can import it into Premiere.
Use HandBrake: This free tool, HandBrake, is great for this. To start encoding, drag your phone or screen recording footage into the program, click on the “Video” tab, and then click on “Constant Framerate.”
Use Adobe Media Encoder: You can also do this in Media Encoder by making an ingest preset that changes the format of the footage to CFR, like ProRes.
Find Corrupted Media: If you think one clip is bad, try the “divide and conquer” method. Make the top half of your timeline layers invisible. Is it still crashing? If not, the issue is in the top half. Keep narrowing it down until you find the exact clip that makes the program crash when you turn on visibility. Once you find that file, re-transfer or re-transcode it.
Level 3: Getting Deeper into Premiere Pro Settings
Now we’re making changes to the engine itself. These settings can make a big difference in how stable things are.
Change the Video Renderer: Click on “File,” then “Project Settings,” and then “General.” Find the setting that says “Video Rendering and Playback.” If it says “Mercury Playback Engine GPU Acceleration (CUDA/Metal/OpenCL),” try switching it to “Mercury Playback Engine Software Only.” If this stops the crashes, it’s a sure sign that your problem is with your GPU or its drivers. “Software Only” will take a lot longer, but it’s a great way to find out what’s wrong.
Give More RAM: On Windows, go to “Edit > Preferences > Memory,” and on macOS, go to “Premiere Pro > Settings > Memory.” To give Adobe Premiere Pro more memory to work with, lower the “RAM reserved for other applications.” Your OS needs at least a few gigabytes of space.
Manage Plugins: Look for the “Plugin Loading” report in the Media & Cache preferences. Check to see if anything didn’t load. To see if Premiere Pro becomes stable, you can move your third-party plugins out of the Adobe plugins folder for a short time. You can usually find the folder at C:\Program Files\Adobe\Common\Plug-ins\7.0\MediaCore.
Level 4: The Last Resorts
If you’ve done everything above and Adobe Premiere Pro keeps crashing, you need to take more drastic steps.
Clean Reinstall: Don’t just uninstall the program normally. To get rid of all traces of Premiere Pro from your computer, use the Adobe Creative Cloud Cleaner Tool. After that, use the Creative Cloud app to do a new installation.
Get in touch with Adobe Support: You pay for a subscription, which includes support. They can often look at crash logs and find problems that the user can’t see. Be ready to tell them about your project, your system, and what you’ve already tried. To get help, go to the Adobe Support Community.
Proactive Habits: A Guide to Living a Life Without Crashes
It’s great to fix things, but it’s even better to stop them from happening in the first place. If you make these habits a part of your daily editing routine, the chances of future crashes will go down a lot.
Start Projects Off Right: Make a clear folder structure for your project before you import any files. This should include folders for “Project Files,” “Media,” “Audio,” “Graphics,” “Exports,” and “Cache.”
The Golden Workflow: This is the process you must follow for every new project:
Move all of your media from SD cards to a fast SSD (not the drive where your operating system is installed).
Use HandBrake to change any phone or screen recordings to CFR.
Put it into Premiere Pro.
Choose all of the 4K/UHD or H.264/H.265 media and make ProRes proxies.
Turn on proxies before you edit.
Save Often: Ctrl+S (Windows) or Cmd+S (macOS) should be a nervous habit. You should also go to “Preferences > Auto Save” and set it to save every 5 to 10 minutes.
Render and Replace: If you have a clip with a lot of heavy effects (like Warp Stabilizer + Lumetri Color + Noise Reduction), right-click on it and choose “Render and Replace.” This puts the effects into a new, clean video file, which makes the processing load less in real time.
Keep Your System Clean: To keep your computer from getting too hot, clean the dust out of the fans and heatsinks every few months.
Questions and Answers (FAQ)
Q1: Will adding more RAM stop Adobe Premiere Pro from crashing?
A: Yes, but only if the problem is not enough RAM. If you only have 16 GB of RAM and are editing 4K video, upgrading to 32 GB or 64 GB will make a big difference in how stable it is. If your crashes are caused by a bad driver or VFR footage, though, adding more RAM won’t fix the main issue.
Q2: Can a certain effect make Adobe Premiere Pro crash?
Yes, for sure. Warp Stabilizer, Neat Video (a third-party denoiser), and complicated Lumetri Color stacks are some of the most common causes, especially on systems that aren’t very powerful. Using them can use up all of your CPU or GPU VRAM, which can cause a crash.
Q3: Why does Adobe Premiere Pro keep crashing when I try to export?
A: This is almost always a problem with the hardware or the media. The export process is the hardest thing you can ask your computer to do. A crash here usually means that the CPU or GPU is too hot. 2) A single corrupted media file or effect on the timeline that it can’t handle. 3) When the render runs out of RAM or VRAM.
Conclusion: Your Way to a Stable Editing Experience
It’s really annoying when Adobe Premiere Pro keeps crashing, but it’s not impossible to fix. It’s not usually as simple as pushing a button; you need to take a more holistic approach to your work. It’s important to know how your software, hardware, media, and workflow all work together.
You can go from being a victim of your software to its master by treating your editing system like a professional workshop. This means keeping your tools sharp (updates), your materials organized (media management), your workbench clean (cache), and using the right tools for the job (proxies).
This guide is like a set of tools for you. Start with the easy fixes, then move on to the diagnostics. Most importantly, start doing the things that will save you a lot of time and frustration. Now, go make something great that will last.
*Please share your own “Premiere Pro keeps crashing” stories and fixes in the comments below! Your experience might be what another editor needs to get through.