
You’re in the zone. The clips are coming together, the cuts are sharp, and the story is coming together. You may have spent hours or even days editing in Adobe® Premiere® Pro. After that, you click “Export.” And you wait. And wait. The progress bar moves so slowly that a snail would look like a sprinter. The hum of your computer’s fans stops your creative flow in its tracks.
We’ve all been through this. As a professional editor and content creator, I can tell you that slow rendering and a timeline that lags behind are two of the most common problems we face. Every minute we spend looking at a progress bar is a minute we could be making something. Time is our most valuable resource.
But what if I told you that you could get that time back? What if you could make everything work faster and boost your whole workflow?
This isn’t about magic or a quick fix that doesn’t work. It’s about making smart, planned changes to your habits, software, and hardware. This 2500-word guide will take you deep into the world of Premiere Pro optimization. We’ll look at every little thing, from well-known tips to lesser-known ones, to help you **faster and speed up Adobe® Premiere® Pro for good.
Get ready to change how you edit. Don’t let that progress bar get in the way of your work.
Understanding the Bottlenecks: Why Is My Premiere Pro So Slow?
We need to know where the problem came from before we can fix it. If Adobe® Premiere® Pro is running slowly, it’s not just a random problem; it’s a sign that there are certain problems with your system. Your editing process is like an assembly line. The whole line backs up if one station is slow.
Based on what I’ve seen and read a lot about, there are usually a few main reasons why performance problems happen:
Hardware Limitations (The Engine): The CPU, GPU, RAM, and storage are the parts of your editing machine that make it work. If your processor is weak, it has trouble encoding; if your RAM is too low, playback stutters; and if your hard drive is too slow, it causes a data traffic jam. Experts at Vagon say that your hardware is often the most obvious but least understood bottleneck.
Inefficient Project Settings (The Blueprint): If you use the wrong “blueprint” for your project, it can make it run poorly from the start. This includes wrong settings for the renderer, settings for the sequence that don’t match, and bad management of the media cache.
Heavy Timelines and Effects (The Cargo): The more you add to your timeline, like 4K or 8K footage, multiple layers, color grades, and heavy effects like Warp Stabilizer or noise reduction, the more “cargo” your engine has to pull. Adding each effect makes the rendering job harder.
Unoptimized Media (The Raw Materials): Not all video files are the same. Editing highly compressed codecs like H.264 or H.265 (HEVC) is very hard, even though they are great for final delivery. Your system has to decompress them in real time, which takes a lot of CPU power.
Now that we’ve figured out what might be wrong, let’s talk about how to fix it. We’ll break this down into groups of things you can do right away.
Basic Fixes: Making Your System and Premiere Pro Settings Work Better
Let’s start with the easy stuff. These are basic settings in your operating system and Adobe® Premiere® Pro that can make a big difference in performance with very little work.
The Mercury Playback Engine: Unleash Your GPU
Without a doubt, this is the most important setting for performance. The Mercury Playback Engine lets Premiere Pro use your computer’s graphics card (GPU) to speed up playback and rendering. If this is off, your CPU is doing all the hard work, which is like trying to win a race with one leg tied behind your back.
How to Use This in Your Daily Life:
Click on File > Project Settings > General.
In the “Video Rendering and Playback” section, find the dropdown menu for “Renderer.”
If you have an NVIDIA card, choose “Mercury Playback Engine GPU Acceleration (CUDA).” If you have an AMD card or are on a Mac, choose “Metal/OpenCL.”
If the option is grayed out, it means that your GPU drivers are old or your card isn’t supported. Get your drivers up to date right away! Adobe has a list of cards that work, but most modern gaming or professional GPUs will work.
Take Control of the Media Cache
Premiere Pro makes a database of “cache” files (like conformed audio files and peak files) to make it easier for it to get to your media. This cache can get too big and broken up over time, or it might be stored on a slow drive, which is funny because it makes you slower.
**How to Use This in Your Daily Life:
Change the Location: Click on “Edit,” then “Preferences,” and then “Media Cache.” Click the “Browse” button and move your media cache to your fastest drive. This should be a separate NVMe or SSD drive that is not your OS or footage drive. By spreading the load over several fast drives, you can avoid bottlenecks.
Clean Up Often: You’ll see a “Delete” button next to “Remove Media Cache Files” in the same menu. It’s a good idea to do this every now and then, especially after finishing a big project. You can also set up a schedule for automatic cleanup, like “Automatically delete cache files that are older than 90 days.”
Set aside RAM for better performance
Premiere Pro automatically sets aside some of your computer’s RAM for itself and leaves the rest for other programs. You can tell it to be a little more “selfish” and put performance first.
**How to Use This in Your Daily Life:
Go to Edit > Preferences > Memory.
There will be a line that says “RAM reserved for other applications.” Lower this number. If you have 32GB of RAM, you could set aside as little as 4–6GB for other programs, leaving 26–28GB for Adobe’s suite.
Change the setting next to “Optimize rendering for” from “Memory” to “Performance.” This tells Premiere to prioritize speed over saving RAM during renders.
Turn off background processes that aren’t needed
Your operating system and Premiere Pro both have features that run in the background and can use up resources.
How to Use This in Your Daily Life:
Turn Off Auto-Save (Sparingly): This is a controversial one, but the auto-save function can sometimes cause a brief stutter or lag, especially in large projects. If you are good at saving things by hand (Ctrl+S or Cmd+S is your best friend), you can go to Edit > Preferences > Auto Save and uncheck “Automatically save projects.” Use this tip with caution!*
Close Other Programs: This may seem obvious, but it’s very important. Shut down your web browser (especially Chrome, which is known for using a lot of RAM), Spotify, and any other apps that aren’t necessary. Give Premiere all the power.
Turn off Live Text Templates and Auto-Sync: If you don’t use these features often, you can get a little more processing power by turning them off in your settings.
How to Edit for Speed to Make Workflows Smarter
Setting things up right is only half the battle. How you actually work in Adobe® Premiere® Pro has a huge effect on how well it works. If you use these professional workflow tips, you’ll not only be able to render faster, but you’ll also enjoy the whole editing process more.
The Magic of Proxies: Your Secret Weapon for 4K and 8K Footage
If you’re editing high-resolution video (4K, 6K, 8K) or using a computer that isn’t the best, this is the best tip for your workflow. A proxy workflow means making low-resolution “stand-ins” for your big source files. You edit with these small, quick proxy files, which lets you play back smoothly, and then Premiere Pro automatically goes back to the original files in full quality for the final export.
**How to Use This in Your Daily Life:
Ingest and Create: You can do this right from the Media Browser when you import your footage. Choose your clips, right-click, and then click on “Proxy > Create Proxies.”
Select a Preset: A window will appear. Pick a format that isn’t too heavy, like H.264 or QuickTime. The preset “ProRes Low Resolution Proxy” is a great choice.
Toggle Proxies: After Adobe Media Encoder has finished making the proxies, a button that looks like two small screens will appear in your Program Monitor toolbar. If it’s not there, click the “+” button to put it there. You can now switch between the full-resolution and proxy files with just one click.
This one change can turn a timeline that stutters every two seconds into one that plays back in real time. It’s a game-changer for anyone who wants to faster and speed up Adobe® Premiere® Pro.
Render and Replace: How to Control Clips with a Lot of Effects
Do you have a specific clip or a nested sequence that has a lot of effects? It could be a complicated After Effects composition that is connected through Dynamic Link, or it could be a clip with Warp Stabilizer, Lumetri Color, and noise reduction all on top of each other. There is usually a red or yellow bar above these clips in the timeline that shows they won’t play back in real time.
You can use “Render and Replace” instead of rendering your whole timeline preview every time you make a change.
**How to Use This in Your Daily Life:
In your timeline, right-click on the clip or nested sequence that has a lot of effects.
Choose “Render and Replace.”
Pick a format that is easy to play back and of good quality, such as QuickTime > Apple ProRes 422 HQ.
Premiere Pro will make a new video file from that one clip and put it on your timeline in place of the old one. The render bar above it will turn green, and it will now play back without any problems. The best part is that this doesn’t hurt anything! You can always right-click the clip again and choose Restore Unrendered to go back to the effects stack you had before.
Make sure you manage your timeline tracks well
Every video and audio track on your timeline that is turned on uses resources, even if there is another layer on top of it that covers the clips.
How to Use This in Your Daily Life:
Turn Off Unused Tracks: If you have more than one camera angle, graphics layer, or B-roll stack, make it a habit to turn off the tracks that you aren’t currently watching or editing. Just click the “Toggle Track Output” eye icon on the tracks you want to hide.
Press the Global FX Mute Button: This button is very powerful. If effects are slowing down your playback, click the “Global FX Mute” button in the Program Monitor. If you don’t see it, you can add it by clicking the “+” button. This turns off all effects on your timeline for a short time so you can focus on the timing of your cuts without any lag. Click it again to turn everything back on right away. It’s a very good way to quickly render faster while editing.
Render Your Timeline Ahead of Time
Final Cut Pro has background rendering, but Premiere Pro doesn’t. You have to render your timeline previews by hand. This makes a preview file on your scratch disk that lets you play back hard parts smoothly.
**How to Use This in Your Daily Life:
Set your In and Out points around the part of the timeline you want to preview smoothly (the part with the red or yellow bar).
Go to Sequence > Render In to Out.
The bar will turn green when Premiere finishes that part. You can now watch it back in real time, with all the effects added. Before you try to play back complicated parts, make it a habit to do this.
The Best Upgrade: Hardware Suggestions for the Best Performance
Smart workflows and software tweaks can get you a long way, but eventually your hardware will be the thing that holds you back the most. If you are a professional or a serious hobbyist, spending money on the right parts will save you time and make you less frustrated.
The CPU (The Brains)
The Central Processing Unit (CPU) is very important for almost everything in Premiere Pro, like running the program and encoding and decoding media.
What Matters: The number of cores and the clock speed (GHz) are both important. In the past, Intel CPUs with Quick Sync technology made it much easier to decode H.264 and H.265 media. However, modern AMD Ryzen processors are very competitive because they have a lot of cores that are great at rendering tasks.
Suggestions:
Good: AMD Ryzen 7 or Intel Core i7
Better: Intel Core i9 or AMD Ryzen 9
Best: AMD Threadripper (for people who need the best rendering power)
GPU (The Muscle)
The Graphics Processing Unit (GPU) is the muscle that makes the Mercury Playback Engine work, as we talked about. A powerful GPU speeds up effects, color grading, and export times.
What Matters: The amount of VRAM (video memory) and processing power. A GPU with at least 8GB of VRAM is highly recommended for editing 4K videos.
Suggestions:
Good: NVIDIA GeForce RTX 3060 or AMD Radeon RX 6700 XT
Better: NVIDIA GeForce RTX 4070 or AMD Radeon RX 7800 XT
Best: NVIDIA GeForce RTX 4090
RAM (The Workspace)
Your computer’s RAM is its short-term memory. You need more RAM for smooth multitasking and playback if your projects are more complicated and the resolution is higher.
What Matters: Size.
Suggestions:
Minimum (HD): 16GB
Recommended (4K): 32GB
Best (Complex 4K/8K/After Effects): 64GB or more
Storage (The Highway)
The speed of your storage determines how quickly Premiere Pro can read and write data. This is a “silent killer” that hurts performance.
What Matters: How fast you can read and write. Get rid of any old spinning hard drives (HDDs) that you use for work.
Suggestions:
OS/Applications Drive: NVMe M.2 SSD that is fast
Project Files/Footage Drive: An NVMe M.2 SSD or SATA SSD that is fast
Media Cache/Scratch Disk Drive: A separate, fast NVMe M.2 SSD
Archive/Backup: A big old-fashioned HDD or a NAS (Network Attached Storage) system.
This kind of multi-drive setup, which professionals at places like Puget Systems recommend, makes sure that data can move freely without a single big bottleneck.
Export Settings: The Last Push
You’ve finished the editing. Now, let’s make sure that the final export is as quick as possible without losing quality.
Use Hardware Encoding
Check your format settings when you go to File > Export > Media. If you picked H.264 or H.265 (HEVC), go to the Video tab. There is a place for Encoding Settings. Check that this is set to “Hardware Encoding.” This uses your GPU to export, which is almost always much faster than Software Encoding, which uses the CPU.
Don’t Go Overboard with the Bitrate
The bitrate of your video file tells you how much data it has. Higher bitrates usually mean better quality, but they also mean bigger files and longer render times. Editors often choose bitrates that are too high and don’t make the quality any better.
For YouTube and Vimeo (4K): A VBR, 1 Pass setting with a target bitrate of 40–60 Mbps is more than enough.
For HD (1080p): A goal of 15–20 Mbps is enough.
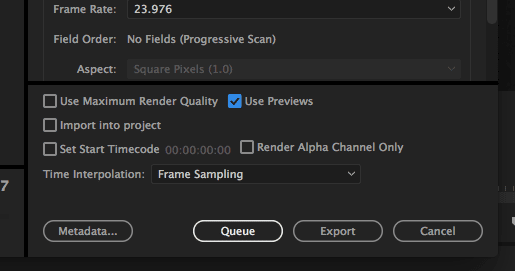
When to Use “Maximum Render Quality”
There is a box that says “Use Maximum Render Quality.” This sounds good, but you should only check it when you are scaling footage (for example, putting 1080p clips in a 4K timeline or the other way around). In other cases, it can make render times go up a lot with little to no noticeable benefit.
The End: Your Path to a Quicker Premiere Pro
We’ve talked about a lot of things, from simple setting changes to big hardware choices. A holistic approach is the key to making Adobe® Premiere® Pro a faster, more responsive creative partner.
Don’t try to do everything at once. Begin with the basic repairs. Turn on GPU acceleration and make your media cache work better. After that, use a proxy workflow for your next project. Look at how it changes things. Use the Global FX Mute button or the Render and Replace function when your system is slow.
If you use these tips every day while you edit, your workflow will slowly change. You’ll have more time to make things and less time to wait. You’ll finally be able to render faster and really faster and speed up Adobe® Premiere® Pro, which will let you use all of your creative powers. Now go do something great.
Source Links and Further Reading:
- Adobe Help Center: Best Practices: Editing efficiently
- Storyblocks: How to make Premiere Pro run faster
- Vagon: Reduce Rendering Times in Premiere Pro
- Puget Systems: Recommended Hardware for Premiere Pro
- https://diolichat.rw/global/